A Framer's Guide
Achieving Success with Wall Panels
By Christopher Tatge
The first time I used wall panels, I didn’t like them. A local lumber salesman had talked a builder into trying them out on a custom home and I was the young, innocent framing contractor who was happy to add anything I could to my small backlog. So, we had a general contractor, lumber salesman, and framer, all with little to no experience with panels. It didn’t go well, and as a consequence, the wall component industry didn’t get another shot at me for another five years.
 The first misstep in this scenario is often the assumption that wall panels are stick framing made easy. Give a good framer a bunch of wall panels and it should go well, right? What people who are not framers don’t understand is that we become masters of our craft with the tricks we know. Little shortcuts that save seconds, minutes, and hours. If a framer hasn’t had success with panels, it’s not because panels are inferior, it’s because the framer hasn’t figured out the tricks yet.
These days, I’m a big proponent of wall panels. The systemized approach to framing that the offsite component process lends to our efforts onsite has played a big role in my ability to scale my business. The consistency my field labor gets from my strong partnership with my component manufacturer (CM) ensures that they know what to expect every time we start a project. That consistency in turn lends itself to speed and efficiency. This is because I have learned the tricks to working with panels. Whether you’re building houses or 300,000 square foot multi-family projects, I hope you can take something from the means and methods we’ve come up with at Dynamic Construction.
Pre-Construction & Shop Drawing Process
There are a lot of decisions that a component manufacturer can make that affect how things go on site. We review the shop drawings to make sure the design is optimized for success in the field, not necessarily efficient in the factory. We crane our wall bundles into place and then hand set the walls rather than craning each wall individually. So, because of that, we ask our CM to keep them less than 12’ long. Exterior walls that run parallel with the floor trusses are built up to the bottom of the subfloor above, saving us the labor of installing and sheathing a ladder truss; it’s the same with demising walls. Beam pockets, point loads, and lath catchers can all be located and installed.
Wall panel technicians are responsible for preparing the wall panel submittal, which includes the wall layout and individual wall drawings, so that they meet the intent of the contract drawings. This is similar to the role of a truss technician. Both wall panel technicians and truss technicians are usually employees of the component manufacturers. It is important to note that truss technicians and wall panel technicians typically are not registered design professionals. After the wall panel technician has finished assembling the wall panel submittal, it will commonly be sent to the general contractor, framer, and the project’s registered design professional for their review. If you are working with wall panels for the first time, the best way to ensure you get what you need is to make sure you are getting a copy of the submittals. Review the drawings, mark up any changes you would like to see, and send them back for production.
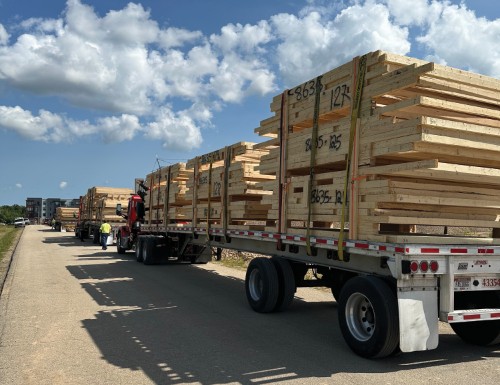
Delivery and Site Logistics
Depending on the size of your project, you might be looking at anywhere from one to twenty semi-trailers to deliver your first level of walls. Talking to your CM about best practices for unloading the trucks on the jobsite can save you a lot of time. There are a lot of different ways that walls are unloaded: sometimes roll-off trailers and/or small truck-mounted cranes are used, and sometimes it’s up to the framer to rent a mobile truck crane.
 Just as important as how you get the trucks unloaded is the order in which the walls arrive. When a wall panel technician puts the finishing touches on a project just before it goes into production, they formulate the truck loading process. That information helps keep the sequencing in order at the factory. If you’re building a single-story garden style 10-unit project and want to work from the inside out so you can use your forklift for everything, your component manufacturer can easily make sure you get demising walls first, interior walls second, and exterior walls last. One key factor, however, is that you communicate this weeks, rather than days, ahead of time.
Snapping Out, Best Fit
When you are snapping out for your project, it’s important to use the layout provided by your component manufacturer rather than the plan set. A good wall panel technician can work the bugs out on a poorly drawn plan set, so the two might not always match up. The wall layout will most accurately represent the dimensions for the wall panels that are going to be delivered to your jobsite. If there is a dimension that is missing or would be helpful to know, the wall panel technician can easily get it for you.
By embracing the right tools, technologies, and workflows, you can transform challenges into opportunities for growth.
We like to snap lines and paint the corresponding wall numbers on the subfloor. Some framers will paint door openings to help with wall orientation. On our big jobs, we also use a bundle placement plan that we receive from our CM to paint the landing spots for our wall bundles.
If it’s possible, maintaining the dimensions per your component manufacturer’s shop drawings is always preferred. Understanding the general contractor’s tolerance for floors and walls to hang over or inside the foundation is very important. If you do need to change a dimension, working with your wall panel technician to decide which wall you need to modify for the lowest impact is a good best practice. Wall panel technicians often understand critical dimensions and can even adjust for the floors above that haven’t been put into production.
There is some interesting technology available to help with the best fit and layout. Dusty Robotics and Hewlett Packard both have printing robots that roll around the jobsite marking wall locations. We like to utilize the Bot Mark system, which was developed by framing contractors and serves us well. These are all great tools to look into to help enhance your production and business.
Pro tip:
If you’re renting a crane to set your panels, get the phone number of the truck dispatcher so you have an accurate estimate for when your walls will arrive. We’ve found that using fork extensions on a 10K forklift works best for us. We can get a truck unloaded in about 15 minutes.
Staging
Our work is mostly on large multi-family projects, so we like to use self-erecting tower cranes for bundle placement. The Liebherr 81k will get you 156’ of reach. You can get out 180’ with the Liebherr 125. While some framers prefer the Potain brand self-erectors, our guys like the 125 most. For single-family, we’ve always found that staging with a forklift and fork extensions is the most cost effective. A 45-ton truck crane is great for speed but can hurt the wallet. Our preferred rigging is a 20’ long four-rope sling and 2-20’ long 2” straps. Our component manufacturer builds the bundles so we can strap under the second wall up from the bottom, allowing us to set wall bundles down without any cribbing underneath. When you’re setting your bundles down, make sure to pay attention to plate orientation - you want to be standing the walls up in the direction they will be placed.
Standing Walls
As framers, I believe we have a tendency to keep manpower tight. It can lend itself to efficiency. However, that is not the case with standing walls. On a single-family job, you can get away with a two-person crew, but you don’t really want to. You should make sure to have four people on site to stand the exterior walls by hand. Being able to handle exteriors without a machine will save a lot of time. Two people for ten hours or four people for three hours – it’s just that simple. On multi-family, we like to have two six-people sets of crews for exteriors. We keep the two extra folks busy nailing guardrails to the face of the wall for the floor above. It saves time in the long run and increases safety. After the exteriors are up, then we break into smaller crews for the lighter walls.
Our workflow is always exterior walls, corridor walls, demising walls, and then interiors, in that order. Everything is bundled separately and landed with our tower cranes, as we need it. Keeping space open helps us avoid handling material twice. You can make a case for doing things differently, but the most important thing is consistency. Our carpenters know what to expect every single time they start installing walls. That consistency over time creates speed.
When you’re going up multiple stories, the building will tend to expand outward. Switching from stick framing and making adjustments to plates in the field, to working with a manufactured product can be frustrating. We solve for this by snapping our exterior walls out per plan and cheating our bottom plate out to flush with the sheeting, while still using the snapped line to plumb up from when we straighten walls. It can make the exterior a little out of plumb, but generally in apartment buildings the living rooms and bedrooms tend to be drawn on the exterior side, while bathrooms and kitchens (where plumb walls are more critical) tend to be drawn on the corridor side. So, we found that we can keep the siders and the trim carpenters happy using this method.
Closing Thoughts
As I said earlier, wall panels are not stick-framing made easy — they’re about making the process smarter and more efficient. Success with panels comes down to preparation, communication, and consistency. From optimizing shop drawings to staging bundles and standing walls efficiently, the systemized approach allows for precision and speed that traditional methods can’t match. By embracing the right tools, technologies, and workflows, you can transform challenges into opportunities for growth. Whether you’re framing custom homes or massive multi-family projects, learning the tricks with wall panels will help you scale your business, maintain quality, and increase profitability. Wall panels may not have won me over immediately, but now, they’re an indispensable part of how my company builds.